Monday 23 February 2009

Yes, I am still alive.

Okay the first thing you're probably gonna notice is that ive got myself a timer! I got it because i wanted to see how much time we had left and it is a heck of alot less than i thought it was going to be, and ive just left it there to help me distribute my time better (and to scare classmates MUHAHAHAHAHA!!!) But it may well vanish as we near the end of the project and really starts bothering me.

Ive had to rework my schedule a bit due to wishful thinking on my part (blendshapes in a day - yeh right) So the plan is-

Blendshapes - finshed by Monday
Rigging + Painting weights - finshed by Weds eve.

And so far im on schedule.


Excuse the crappy cheesy animation, twas only a quick test to see if all the blendshapes are working together which they seem to be (if anyone sees any errors let me know). Its been a pretty steep learning curve over the past couple of days, luckily i only had to restart the blendshapes once. And incase anyone wondering its 9 mouth controls, 4 eyebrow controls a nose and two eyes. And I didnt want to spend time configuring the controls to float off to the side of his head so i knocked together some quick outline heads and applyed to controls to that, it just means that i'll have to have another window open with this view in it.

Now onto an entirely new set of problems...rigging.


Tuesday 17 February 2009

Success within Failure!!!

Its been an up and down day. Firstly as far as i can tell my modelings all done (YAY) I'm really pleased with the way its turned out and am now living in constant fear that its all gonna go horribly wrong in rigging or animation.

I decided the modelling was done about just before luchtime so started adding texture to the model, this is all where its gone kinda tits up. After about a hour shifting UVs around in the texture editor i concluded that the process i have been using (photos of plasticine) isnt going to work.
The process works fine and is a definate way of achieving the look of plasticine in
3D but to get it working well on the complete body would take alot of time and effort, and time isnt something i really have on my side right now.
So what ive done is designate 2 block colours dark brown for fur, peachy for chest, face, hands and feet. I then UV mapped these onto the model and then added a burn where i think its necessary on the model. I then added a brownian bump map ontop to make it look like its been sculpted (personally i prefer it without the bump but it doesn't look as plastciny). Im im really pleased with the outcome. I still need to do the eyes and interiot mouth.

And just for shits and giggles here it is without the bump...
I also spent a couple of hours trying to get the maya sun and sky working but it just seemed to make the image really overexposed and hazy, in the end i got fed up and managed to achieve this lighting with a couple of directional lights.

Monday 16 February 2009

Animation Vids

To keep up with goings on within the industry i keep an eye on several blogs from different animators, these are good for finding out how different animators work and for getting tips on how to improve your animation. But they also show loads of stuff that interests them, videos photos etc just thought i'd do a quick blog for people showing some vids i've been shown - not necessarily useful in the current project but very relevant to animation as a subject.

Righty the first is a music video for "Her morning elegance" by Oren Lavie. I think this is an amazing video, i think it really shows how humans can be used for stop motion and how effective this can be when done properly.


The second is a puppet show performed by the jonas brothers. Ive seen this video posted on a couple of blogs. This is amazingly simple but really proves the point of how inperitive character and motivation are to bringing somethig to life.


Finally, this is a documentry made a couple of years ago and hosted by Rowan Atkinson. The documentry is laid out in a very amusing way (the first time i saw it i didnt take it too seriously) but if you break it down into the basics of what is being said its all very relevant stuff about visual comedy, and its good for a laugh.

Part1: http://www.youtube.com/watch?v=E9fsn6lQBV4
Part2: http://www.youtube.com/watch?v=r7JGaLgF8HM&feature=related
Part3: http://www.youtube.com/watch?v=_9k9lWYwrBY&feature=related
Part4: http://www.youtube.com/watch?v=gJcpm31yYqY&feature=related
Part5: http://www.youtube.com/watch?v=sYrK0VhMjyI&feature=related

Thats all for the time being.

Wow busy day for blogging!

Sorry couldn't pass up the oppotunity to make a liar out of Sarah (tut tut naughty Sarah) i DID save the test rig we did together (though ive only just found it)

We were following a tutorial on how to make an IK FK switch with the rig and i think we did pretty well up till abut half way through the tutorial when we realized we had about anothr 3 hours work ahead of us, to be honest we wernt certain whether we were going to use this process (or in my case whether im gonna us IK's at all) and it seemed alot of work for something that we might not use, so we decided to call it a night and egt on with something more practical at home.

I did gather one pretty major thing out of doing this though, its possible to parent nurbs curves to Fks without any of the rig dissapearing, the only problem is its a MEL script and even more importantly its a MEL script that i didnt write down at the time - please excuse me whilst i go headbutt a wall.

Decision Made

Im not gonna merge the verts, did some experimenting and i think it looks fine as it is.

It still need work but considering ive been preparing the rig for the verts to merge i think its surprisingly successful ( i didnt expect it to work) There are several areas that i need to fix, the head has not bottom, i got rid of the faces ready for the merge, this isnt too hard to overcome i'll just have to import a head from earlier on before i gt rid of the faces. I also now need to sort out the area round the bottom of the head to allow the head look around, at the minute sometimes the geometry clashes especially when he's looking right.

Nearly done....I hope....

Im in a bt of dilema....should i connect the head verts to the body or simply combine the geometry... Simply combining will be a heck of alot easier and quicker but i'm not too sure how that will effect the painting weights or how it will look... However combining should greatly reduce the possiblity of it going wrong... hmm tis a toughee, another worry i having is he hasnt got uch of a neck, combining the geometry means his head can just swivel on the spot solving the movement restrictions whereas merging the verts eans lots of weight painting round what little nekc he has. I think im gonna have to do a really quick rig test.

Coraline

Would be very surprised if you havnt heard of Henry Selicks new film Coraline, but for those who havnt...


Watching the trailer for Coraline something immediatly jumps right out at me and thats how distinctly CG the film looks. You may disagree with this, if so show this to a member fo your family and see what they think it was done in, i can pretty much guarantee they will say computer. I think one of the main reasons for this is all the movement is so damn smooth (though in some places lacking a believable sense of weight)

Analysing it now the more i look at it the more it does look like conventional puppetmotion, but when first seeing it, it does look CG. Makes me wonder how much more puppetmotion could be achieved and if the outcome is so CG why not just make the film in CG, im quite surprised the producers didnt insist upon this given the staggering technical aspect of this film, for example one of the puppets wigs (long blonde) is made of over 5 miles of thread!

Am really looking forward to this film, it really looks like a nice refreshing dark story (the first person who says Tim Burton style gets punched in the face)

Checkout the films website theres already some really cool making of films in the Theatre section.

Saturday 14 February 2009

And yet...more texturing.

Right i think i've got it cracked...Would actually really like some feedback on this from peeps. Is it done or am i barking up the wrong tree.

Had to be very careful with the lighting on this cause the source image was brown plasticine with black in it, ive done down the balc quite alot but i had a blue backlight and it made the darker areas really stand out especially on the muzzle and it looked quite weird.

Thursday 12 February 2009

Texturing...

I'll be honest, im struggling to get these texture working the way ive been vizualising them. I think it may be the source photos that ive taken are too flat and with very little variation in colour.
Another thing is, im actually liking what im producing...it just doest look like clay.

Think im gonna have to press on gettig the head finished now and come back to this later.

Wednesday 11 February 2009

UV mapping - also known as THE DEMON SPAWN FROM HELL!!!

Meh, i exagerate its not that bad *eye twitch*. Im just annoyed that i spent thre hours trying to sort out my mesh in a planer map only to find out that if i set it to a cylindrical map it does it all for me *another eye twitch*

Really should have consorted my stop staring book sooner rather than following the directions of some beetnick oddball on youtube.Ah well at least its working.

Here the final head in stunning greyscale! I still need to add eyelids (whihc ae just gonna be a two quarter of a semi circles that dissapear into the head, and the interior of the mouth which is modelled.

And here is a rough head using UV mapping, the head textures are made of plascticine photos, but i havnt put and swirls in there or bump in there yet so at the mo' the brown looks like its made of cloth and the muzle... i dont really know what the muzle looks like but i still dont like it. The lightnings nice though. I think i may need to add a displacement map as well as a bump... now i just need to lear how to apply a displacement map...

Onto more pressing matters a schedule!

Week 5 :
UV maping test - check, though still need to master the plascticine look.

Finish modeling - Just need to attach things together- hands, mouth, etc

Week 6:
Blend shapes - Hopefully wont run into any errors, did a test earlier and it was all working fine.
Rigging - Not gonna bother with FK, IK switch will just keep it simple.
Painting weights – Probably gonna be hell but as it stands im optimistic.

Week7: Start animating! Woo.

Week 8: Finish animating. Lights and Cameras (if they havnt already been done)

Week 9: Render and Hand in.

Note to self - blogspot is really shit at layouts when scheduling.

Monday 9 February 2009

The Gogs.

Just re reading my blog and realized that I really need to show more evidence of where my inspiration for the project comes from. I metioned the gogs in an earlier post. Watching them is what made me decide to do a more complicated model than is perhaps necesary, I really large foreheads and how each charcter has very distinct design - if you didnt know they were a family you wouldnt have guessed it going by resemblence. I also really like the crude humour but dunno if i'll do anything like it in my animation.

Heads Up...

Just a progress report.

Spent the last week or so trying to get the head modeled. After several failed attempts in NURBS i decided to just go with polygons.
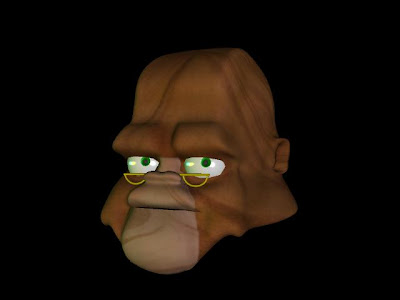
I was origionally going to have eyelids that were part of the face mesh and extruded out to blink using a blend shape, but when playing around with the mesh i figured it would be a heck of a lot easier to just have quarter of a sphere flip out as a eyelid similar to what max for maya has, this should fit alright seeing as its very similar to what they do in Wallace and Gromit and Tim Burtons puppetmotion films. I reasonably pleased with what ive got so far, a bit worried about the mouth but gonna spend the next day or so focused on getting it right, gotta do an interior mouth as well though it isnt going to be overly complex.

Heres the smoothed head with the smoothed body geometry, looking at it now i think the body looks a bit sparse compared to the hands and head, i may have to do a bit more to it to make it fit in better though thinking about it the ars arnt finished yet so will do them first and see what that does for it.

And here is the two halves put together quickly, that lower part of the mussle looks really shit and just drags down the rest of the face with it...will need to get that sorted. And then theres all the little things ive got to perfect on the head like getting the nose right and maybe bringing the eyebrows closer together. And for the record ears are a pain in the arse.

Tuesday 3 February 2009

Its a start

Righty i thought now would be a good time to summerize what ive been doing towards modeling thus far.
These are the drawings that im going to be modeling with, You may notice that ive only drawn half of the body this is because when im modeling it i'm going to mirror the body to save time and effort though this is fairly common practise and im pretty sure anyone reading this already knows it.
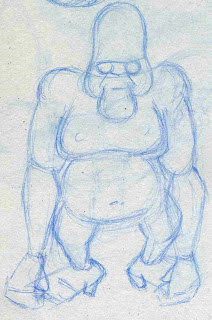
And heres the final thing....nah not really. The day after i did the drawings to start modeling i was sitting listening to Jared when it struck me that it might not work. I had given him an enormus body and tiny little legs and so when he went down onto his knuckles his body might scrape along the floor. I didnt wanna loose so many weeks work only to find out this is the case so i did a quick rig using the model sketches
It works relativly well, im glad i did this and would incourage others to do the same because although the belly didnt drag like i feared i noticed a couple of other errors and things i wasnt happy with. For instance the arse stuck out ALOT more than it should have been so much so that it was nearly above his head ( you cant really see it from this angle) and the boobs sat alot further down the body than i liked when he was crouching like this. All these things have now been changed.

This is how the real modellings actually going. I doing it fairly low poly and then smoothing it out twice so you get the nice curves that im liking on the body and legs. The arms have smoothed in a way im not overly pleased with so i will fix it when i apply the smooth, this is probably gonna be a big headache but i dont know another way to do it.

Sunday 1 February 2009

Playing with Plasticine

To get the placticiney look i am going to UV map the model using photos of plasticine. I dunno if anyone else is doing this, if they are i havnt seen 'em doing it. People seem to just be using filters and effects within Maya to get the look of Plasticine. Anyway ive had a quick go and heres my first results.
Considering its a low quality quick test im pleased with the outcome. Theres alot of room for improvement though. The plastcine i was usinf was only about 3cm square so everything was kinda off, fingerprints were massive and covered everything, i countered this by using a gaussian blur in photoshop but the effect of them being so big on the 3cm clay doesnt really work. Because the fingerpints stretch round the cylinder they give a woody or layered rock effect.

The Concept Process

Righty my concepts all fin. Decided i would post it all in one go rather than create a new post everytime i put pencil t paper. Didnt really spend ages on this.
My first drawing didnt really know what i was doing and just did the first thing that came into my head after reading the brief.

Funny some of the stuff your mind comes up with... A scary version and some kiddy versions
Getting a bit closer to a design... and an attempt at a body.

Ugly Ugly drawings.

Finally a nice design. This is the design that I am using but when i first drew it came to the conclusion that it wouldnt work brilliantly in clay, so i then spent some time trying to develop the design to simplify it and make it rounder but in the end i thought i might as well go along with this one because it as my favorite and worry about making look nice in clay when i start texturing. When designing him in my head i always kinda pictured him as kind of an old fashioned victorian english teacher (a tad specfic) and i think this drawing just portraits it perfectly.
You can kinda see the influence from the main drawing especially in the last one but i still donet think that any of them work as well as the drawing they were based on.
I was trying to think of some claymation films that i know off other than wallace and gromit and i remebered watching one about cavemen years ago about the same time that W+G firt became popular. It was called Gogs and was about a family living in the past, so i went looking fo it and found a coupla episodes on the net, the first thing i latched onto was the fact that the models were fairly complicated and not that desimilar to what i had drawn, so i went back to the design i liked and devloped that a bit further, here you can see me playing with anatomy trying to get the body right and trying to give him a skull so that it give me some referance.


And there we go....I'm still not sure about the tie...we may loose that in modelling....infact we'll probably loose that in modelling.

Points of Significance

Forgot to mention the areas im focusing on...

Concept work - meh not so much, drawing the same thing over and over doesnt really thrill me, when i get a design i like i just go with it.

Modelling - Yep this is a point of focus. Probs gonna spend more time than is healthy stressing this area trying to get it perfect.

Rigging - Not really. Am gonna do the best with the least amount of work with this, i know its an important stage but its something i find really boring, the only half interesting thing about the rigging is blendshapes. So i'll make sure i do the best in the shortest amount of time.

Texturing - Yep I really wanna learn more about texturing this term because i know very very little about it, so i think i may spend quite a bit of time working this out.

Animation - Although i am going to be doing animation in the piece im not going to worry about the narration until i need to animate. Ive got ideas for stuff but i'll worry about exactly what im going to do when it needs to be done. Though im going to leave myself a couple of weeks to animate because this is what really interests me and will be a point of interest.

So points of interest: A little of all but mainly focusing on the Modelling, Texturing and the animation.